
Pickled chili peppers are a fantastic way to preserve the vibrant flavors of chili peppers while adding a tangy, spicy kick to your dishes. Whether you prefer them whole or sliced, these pickled delights can be used to enhance sandwiches, tacos, salads, and more. The process is simple and the result is a jar full of zesty goodness that can elevate any meal.
While most of the ingredients for this recipe are common pantry staples, you may need to make a special trip to the supermarket for fresh chili peppers. Depending on your preference, you can choose from a variety of chili peppers, such as jalapeños, serranos, or even habaneros for an extra fiery kick. Make sure to also pick up some white vinegar if you don't already have it at home.
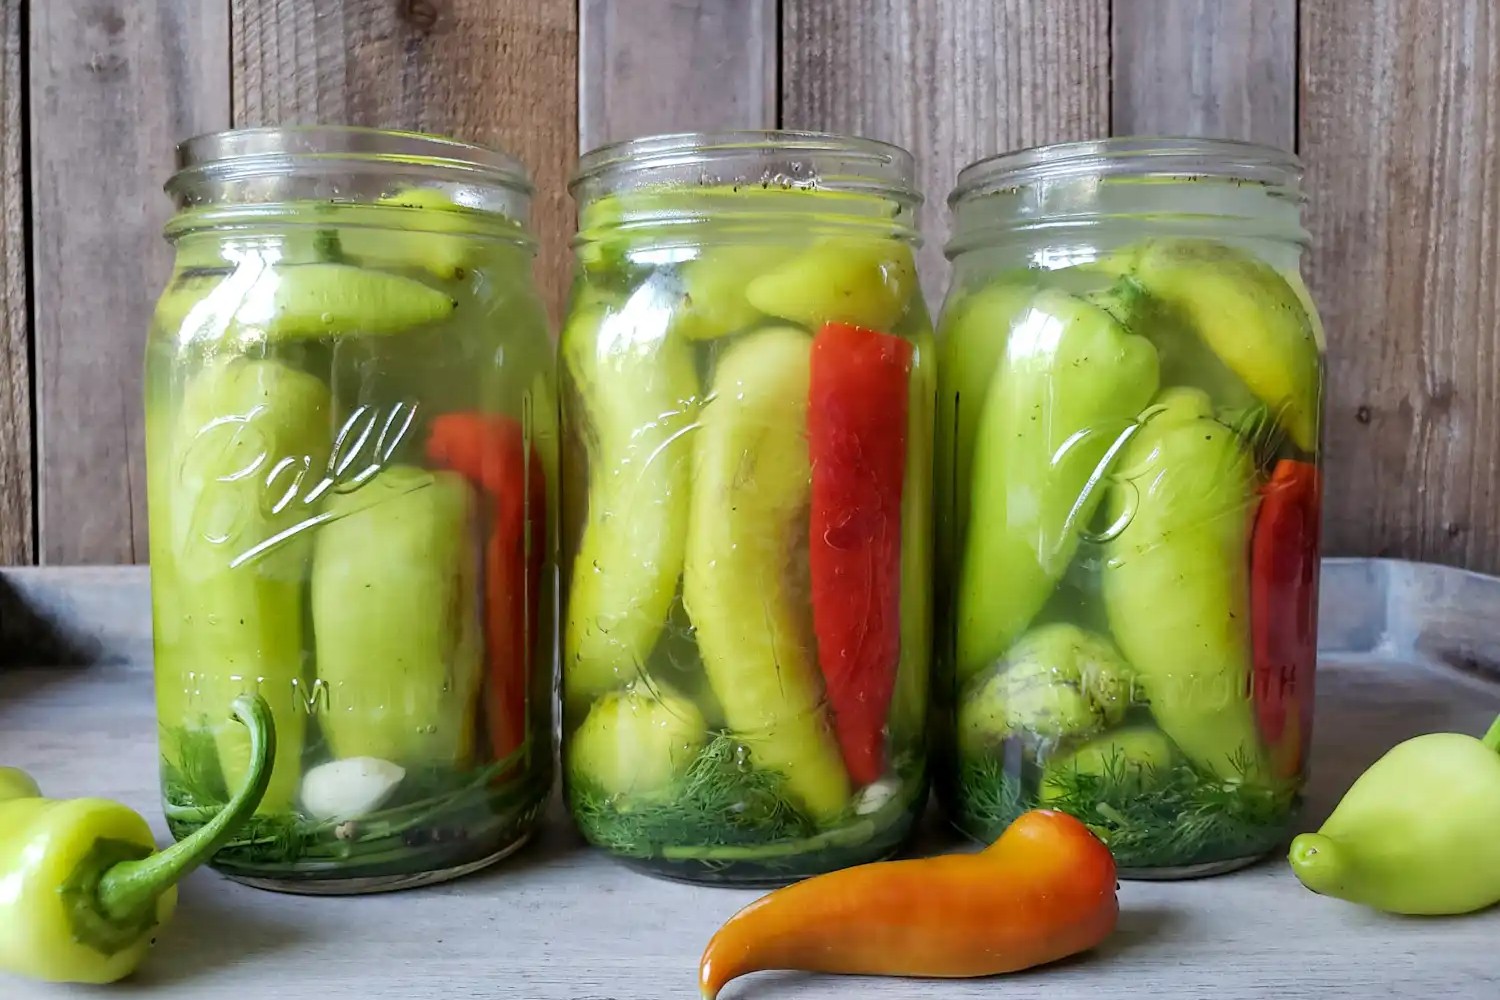
Ingredients for Pickled Chili Peppers
Chili peppers: The star of the recipe, providing the heat and flavor. Choose your preferred type based on your spice tolerance.
White vinegar: Essential for the pickling process, giving the peppers their tangy taste.
Water: Used to dilute the vinegar slightly, balancing the acidity.
Sugar: Adds a touch of sweetness to counterbalance the acidity and heat.
Salt: Enhances the overall flavor and helps with the preservation process.
Garlic: Adds an aromatic depth to the pickling brine, complementing the chili peppers.
Technique Tip for Pickling Chili Peppers
When preparing chili peppers for pickling, consider using a small knife to make a few slits in each whole pepper. This allows the vinegar mixture to penetrate more thoroughly, ensuring the peppers are evenly pickled and infused with flavor.
Suggested Side Dishes
Alternative Ingredients
Pickled chili peppers - Substitute with pickled jalapeños: They offer a similar level of heat and tanginess, making them a great alternative in recipes.
Pickled chili peppers - Substitute with pickled banana peppers: These are milder but still provide a nice tangy flavor, suitable for those who prefer less heat.
Pickled chili peppers - Substitute with pickled pepperoncini: These peppers are slightly sweet and tangy, offering a different but complementary flavor profile.
Pickled chili peppers - Substitute with pickled serrano peppers: Serrano peppers are hotter than jalapeños and can add a more intense heat to your dish.
Pickled chili peppers - Substitute with pickled bell peppers: For a milder option, pickled bell peppers provide a sweet and tangy flavor without the heat.
Alternative Recipes Similar to Pickled Chili Peppers
How to Store or Freeze Pickled Chili Peppers
- Ensure the pickled chili peppers are completely cooled before storing them. This helps maintain their crisp texture and flavor.
- Store the jar in the refrigerator. The cool temperature slows down the fermentation process, keeping your pickled chili peppers fresh for a longer period.
- For optimal flavor, let the pickled chili peppers sit in the refrigerator for at least 24 hours before consuming. This allows the flavors to meld together beautifully.
- If you plan to store the pickled chili peppers for an extended period, make sure the jar is sealed tightly to prevent any air from entering and causing spoilage.
- Check the jar periodically for any signs of spoilage, such as mold or an off smell. If you notice any, discard the contents immediately.
- If you wish to freeze the pickled chili peppers, transfer them to a freezer-safe container or bag. Make sure to leave some headspace to allow for expansion.
- Label the container with the date of freezing. This helps you keep track of how long the pickled chili peppers have been stored.
- When ready to use, thaw the pickled chili peppers in the refrigerator overnight. This gradual thawing process helps maintain their texture and flavor.
- Avoid refreezing pickled chili peppers once they have been thawed, as this can compromise their quality.
- For best results, consume frozen pickled chili peppers within 3-4 months. Beyond this period, they may start to lose their vibrant flavor and crispness.
How to Reheat Leftovers
Stovetop Method:
- Place a small saucepan over medium heat.
- Add the pickled chili peppers along with a few tablespoons of the pickling liquid.
- Heat gently, stirring occasionally, until the peppers are warmed through. Avoid boiling to maintain their texture.
Microwave Method:
- Transfer the pickled chili peppers to a microwave-safe dish.
- Add a splash of the pickling liquid to keep them moist.
- Cover the dish with a microwave-safe lid or plastic wrap, leaving a small vent.
- Microwave on medium power for 1-2 minutes, checking halfway through to ensure they are evenly heated.
Oven Method:
- Preheat your oven to 300°F (150°C).
- Place the pickled chili peppers in an oven-safe dish.
- Cover the dish with aluminum foil to prevent drying out.
- Warm in the oven for about 10-15 minutes, or until heated through.
Steaming Method:
- Set up a steamer basket over a pot of simmering water.
- Place the pickled chili peppers in the steamer basket.
- Cover and steam for about 5-7 minutes, or until they are warmed to your liking.
Sautéing Method:
- Heat a small amount of olive oil or butter in a skillet over medium heat.
- Add the pickled chili peppers and sauté for 2-3 minutes, stirring frequently, until they are heated through and slightly caramelized for added flavor.
Essential Tools for Pickling Chili Peppers
Jar: A container used to store the pickled chili peppers. It needs to be sterilized to ensure the preservation of the peppers.
Saucepan: Used to combine and heat the vinegar, water, sugar, and salt mixture.
Tongs: Useful for handling the hot jar after sterilization.
Ladle: Helps in pouring the hot vinegar mixture over the chili peppers in the jar.
Knife: Used to slice the garlic cloves.
Cutting board: Provides a surface for slicing the garlic.
Measuring cups: Used to measure the vinegar and water accurately.
Measuring spoons: Used to measure the sugar and salt accurately.
Stove: Provides the heat source for boiling the vinegar mixture.
Pot: Used to boil water for sterilizing the jar.
How to Save Time on Making Pickled Chili Peppers
Prepare ingredients in advance: Measure out the vinegar, water, sugar, and salt ahead of time to streamline the process.
Use pre-sliced garlic: Save time by using pre-sliced garlic instead of slicing it yourself.
Sterilize multiple jars: Sterilize extra jars in one go to have them ready for future batches.
Boil vinegar mixture while sterilizing: Start boiling the vinegar mixture while the jar is being sterilized to cut down on waiting time.
Use a funnel: Use a funnel to pour the hot vinegar mixture into the jar without spills.
Pickled Chili Peppers (Whole or sliced)
Ingredients
Main Ingredients
- 500 g Chili Peppers whole or sliced
- 2 cups White Vinegar
- 1 cup Water
- 2 tablespoon Sugar
- 1 tablespoon Salt
- 2 cloves Garlic sliced
Instructions
- 1. Sterilize the jar by boiling it in water for 10 minutes.
- 2. In a saucepan, combine vinegar, water, sugar, and salt. Bring to a boil.
- 3. Pack the chili peppers and garlic into the sterilized jar.
- 4. Pour the hot vinegar mixture over the peppers, ensuring they are fully submerged.
- 5. Seal the jar and let it cool to room temperature. Store in the refrigerator.
Nutritional Value
Keywords
More Amazing Recipes to Try 🙂
- Pickled Radishes15 Minutes
- Cucumber & Tomato Salad (Simple, finely chopped)10 Minutes
- Tahini (Plain paste/Sauce/Dip)10 Minutes
- Pickled Okra25 Minutes
- Marinated Anchovies (Gavros Marinatos - White Anchovies)20 Minutes
- Pita Bread with Za'atar baked on1 Hours 10 Minutes
- Roasted Potatoes with Lemon & Oregano (Greek Style)1 Hours
- Lahm bi Ajeen / Sfiha (Small Meat Flatbreads)45 Minutes
Leave a Reply